I’ve been testing Exchange 2007 recently and overall I’m impressed. Smooth and powerful; and the built-in anti-spam is a great improvement on what is in Exchange 2003. One of the features lets you redirect spam to a quarantine mailbox. You know the kind of thing: it’s a junk bucket, and someone gets the job of sifting through it looking for false positives, like lotteries you really have won (still looking).
Sounds a nice feature, but apparently Microsoft did not quite finish it. The quarantine is a standard Exchange mailbox, which means you have to add a quarantine user. To view the quarantine, you log onto that mailbox. A bit of a nuisance, but not too bad once you have figured out the somewhat obscure means of opening another user’s mailbox within your own Outlook. You’ll notice a little usability issue. All the entries are non-delivery reports from the administrator. You cannot see who they are from without reading the report, making it harder to scan them for genuine messages.
Another issue is when you find an email you want to pluck out of the bucket. My guess is that you will need to Google this one, or call support. The trick is to open the message, and click Send Again. It is counter-intuitive, because the message you are sending again is not the one you can see – that’s the Administrator’s report – but the original message which is otherwise hidden.
So you hit Send Again. As if by magic, the lost message appears. Great; but there’s another little issue. If you hit Send, the message will be sent from you, not from the original sender.
Both issues can be fixed. The fix for Send Again is to log on as the quarantine user – opening the mailbox is not enough. Since it is not particularly easy to switch user in Outlook, the obvious solution is Outlook Web Access; or you could use Switch User in Vista to log on with Outlook as the quarantine user. Send Again will then use the original sender by default.
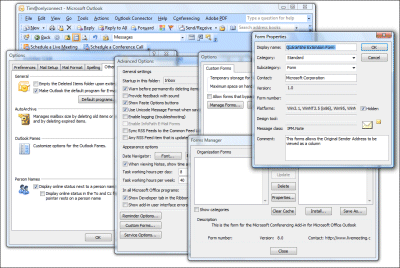
How about being able to see the original sender in Outlook? No problem – just follow the instructions here. I won’t bore you by repeating them; but they form, I believe, a new winner in the Outlook obscurity hall of shame. After using Notepad to create and save a form config file, you use the UI to install it, and here’s a screenshot showing how deeply the required dialog is buried:

A few more steps involving a field picker dialog reminiscent of Windows 95, and now you can see all those faked sender email addresses:

The mitigating factor is that the anti-spam rules themselves are pretty good, and I’ve not found many false positives.